


Halloween Scotcheroos
These Halloween Scotcheroos are the ultimate no-bake treat — chewy, chocolatey, and dressed up with spooky eyes and a mummy drizzle for the season. This classic favorite is quick to make, fun to decorate, and the perfect mix of nostalgic flavor and festive Halloween flair!
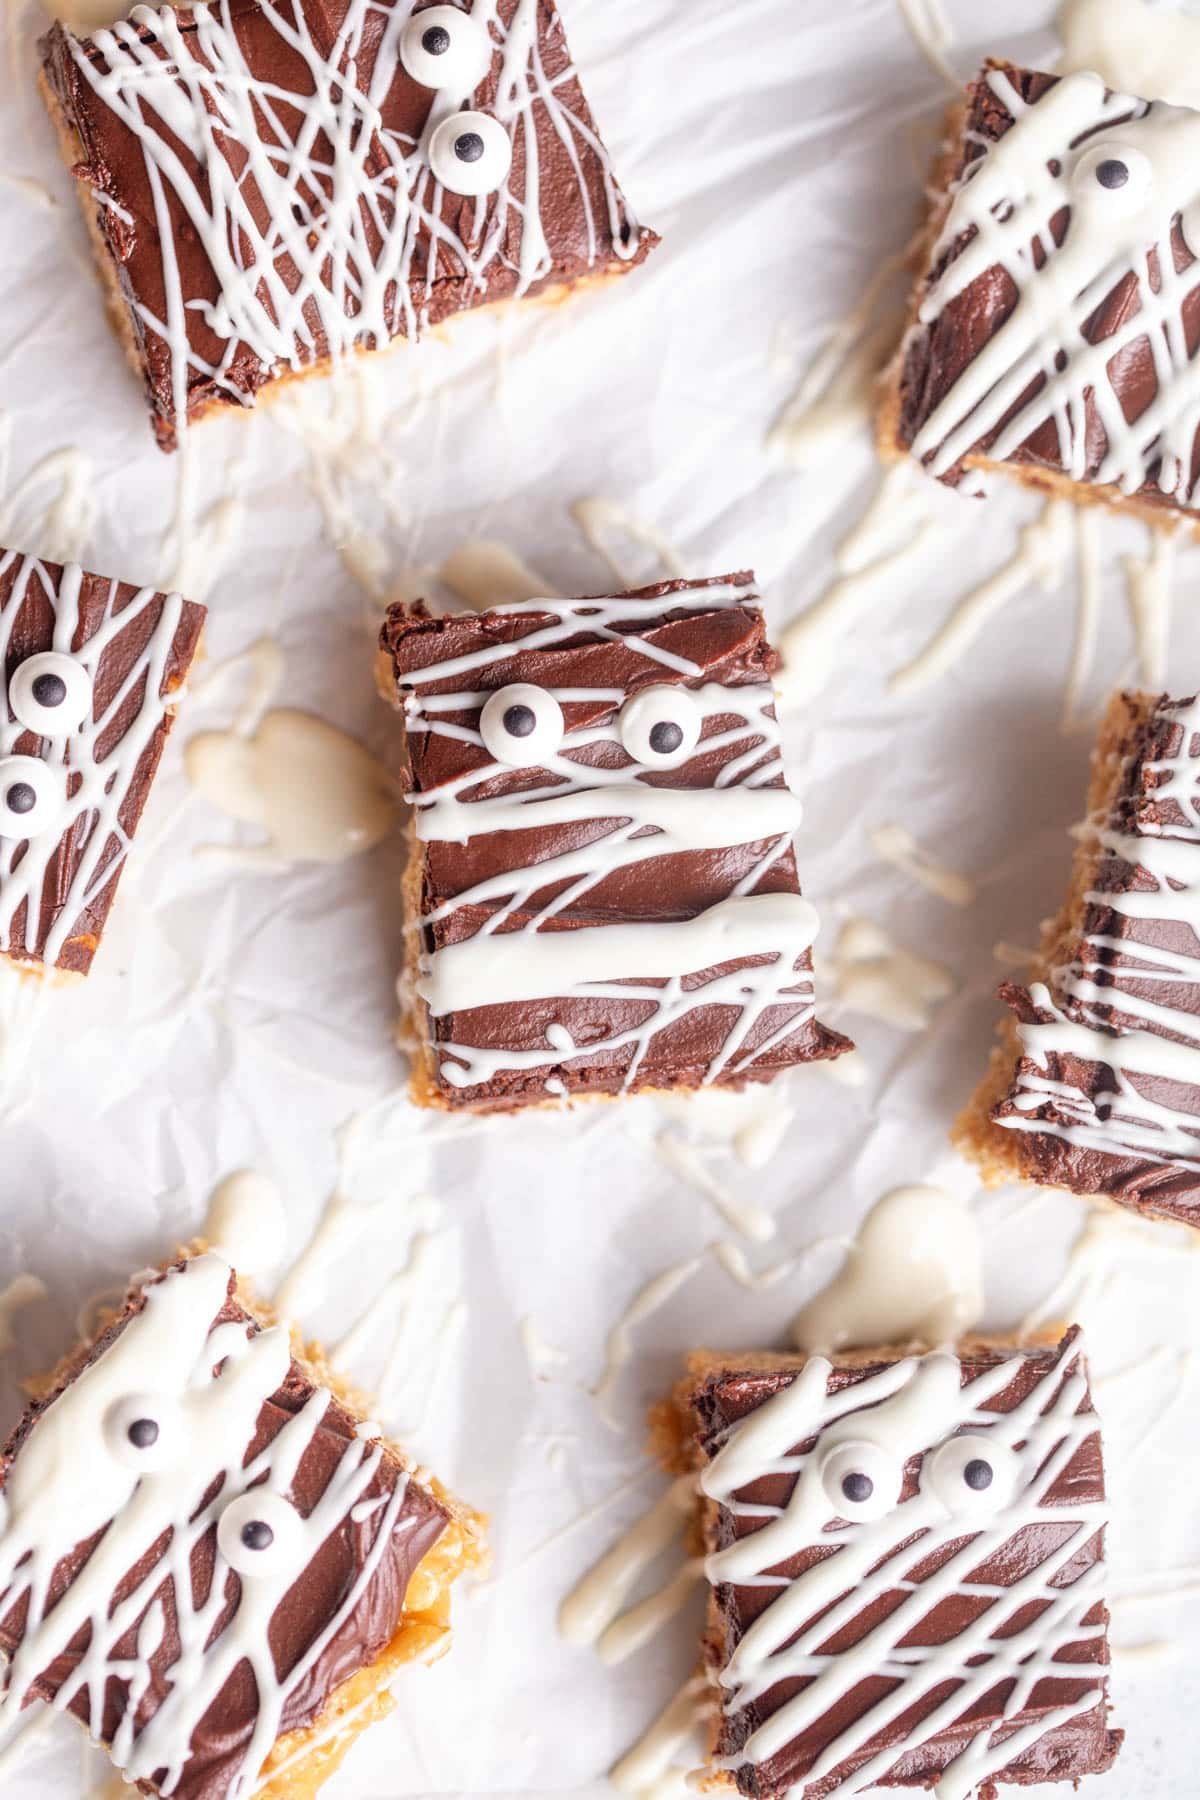
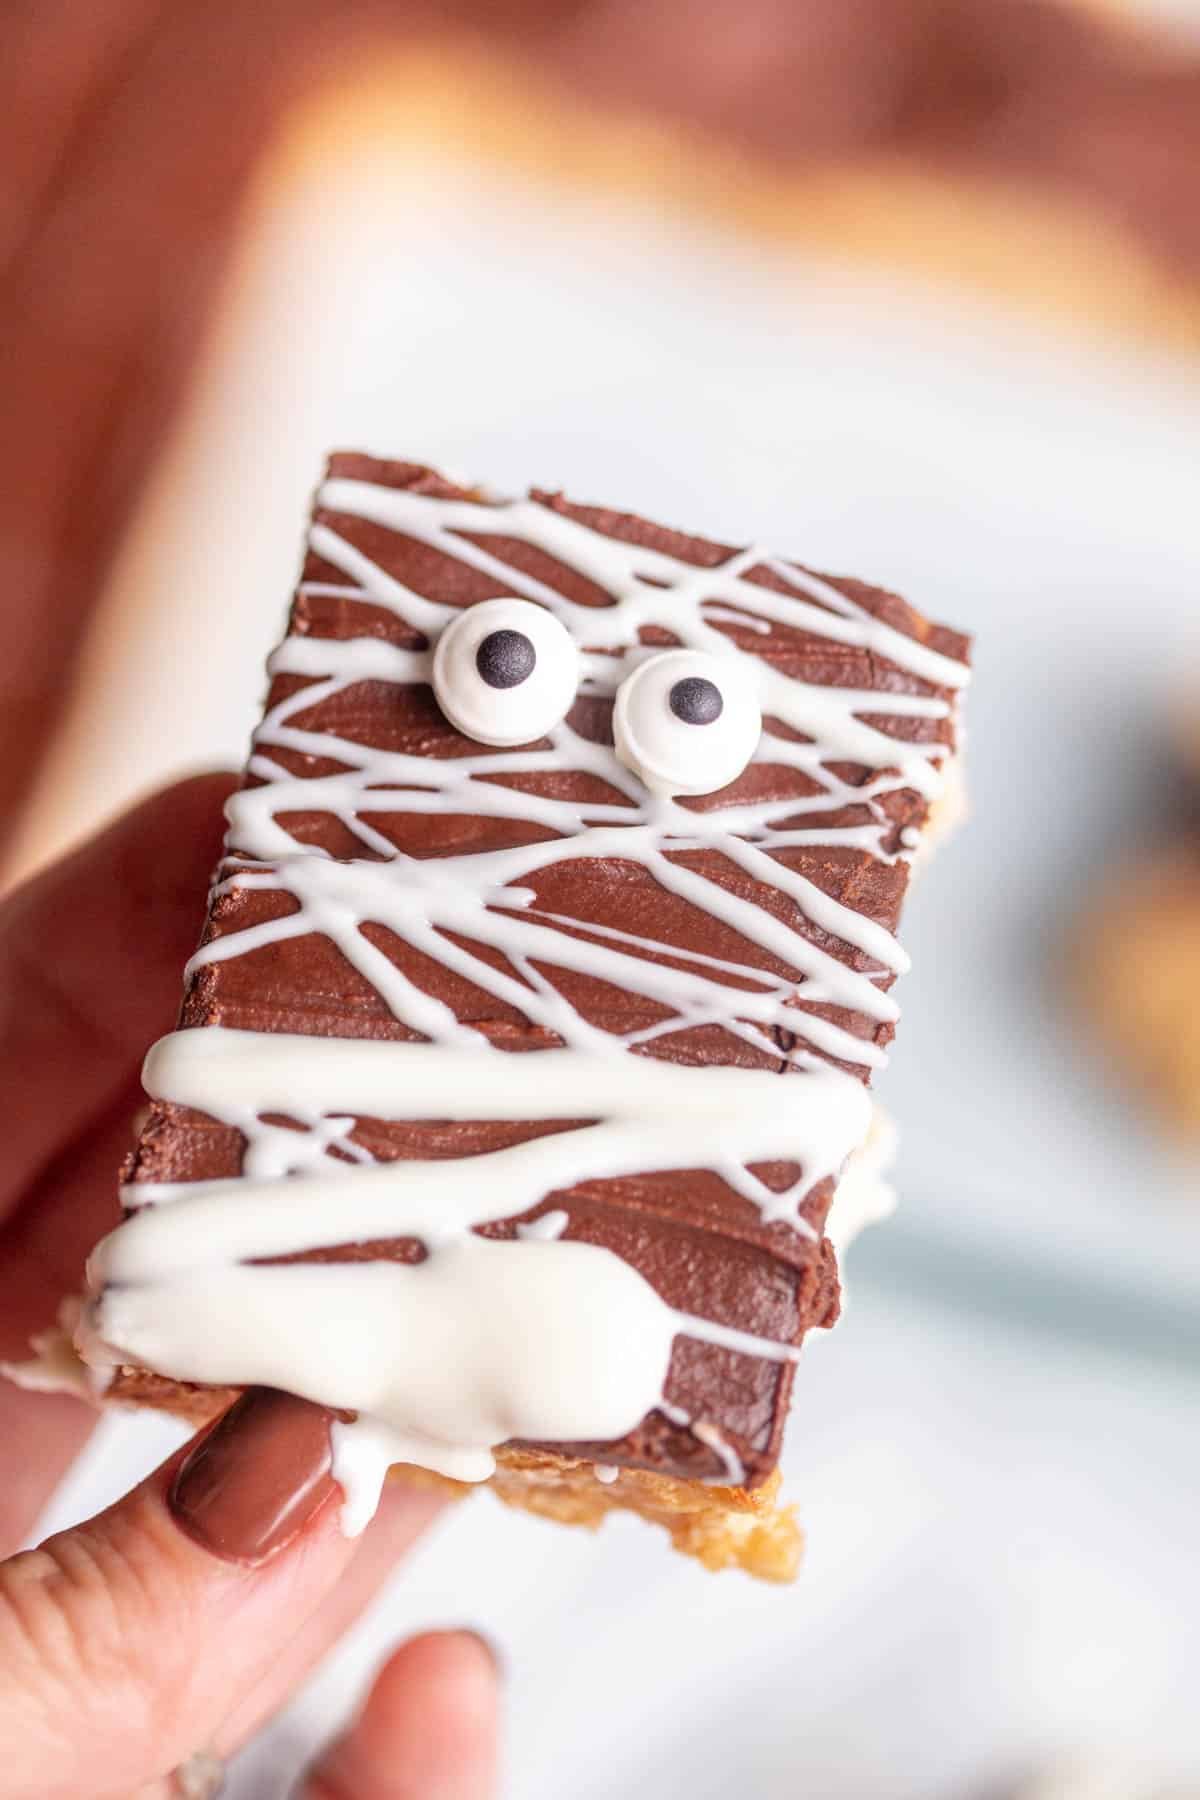
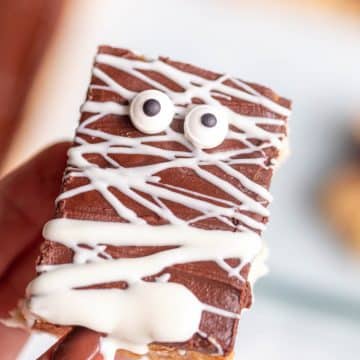
It’s spooky season—and that means it’s time to whip up treats that are as frightfully fun as they are delicious! These Halloween Mummy Scotcheroos put a playful twist on the classic no-bake bar you already know and love. Think rich, chewy peanut butter and butterscotch goodness wrapped up in a white chocolate “bandage” and topped with candy eyes for just the right amount of spooky-cute charm.
Perfect for parties, classroom treats, or a cozy night of Halloween movie marathons, these mummified scotcharoos come together quickly and are guaranteed to disappear faster than you can say “boo!” So grab your saucepan and some candy eyes—it’s time to bring a little sweet magic to your Halloween spread.
Jump to:
Why You'll Love This Recipe
- No-bake magic - no oven required! These come together quickly on the stovetop, which makes them perfect for busy fall days around Halloween.
- Sweet and chewy perfection - a mix of peanut butter, chocolate, and crispy Special K cereal gives that signature scotcheroo texture everyone loves.
- Spooky-cute presentation - the white chocolate “bandages” and candy eyes make them irresistibly festive for Halloween parties.
- Kid-friendly fun - little hands will love helping drizzle on the “wrappings” and stick on the eyes.
- Make-ahead treat - they keep beautifully for a few days, so you can prep them before the big Halloween bash.
Ingredients
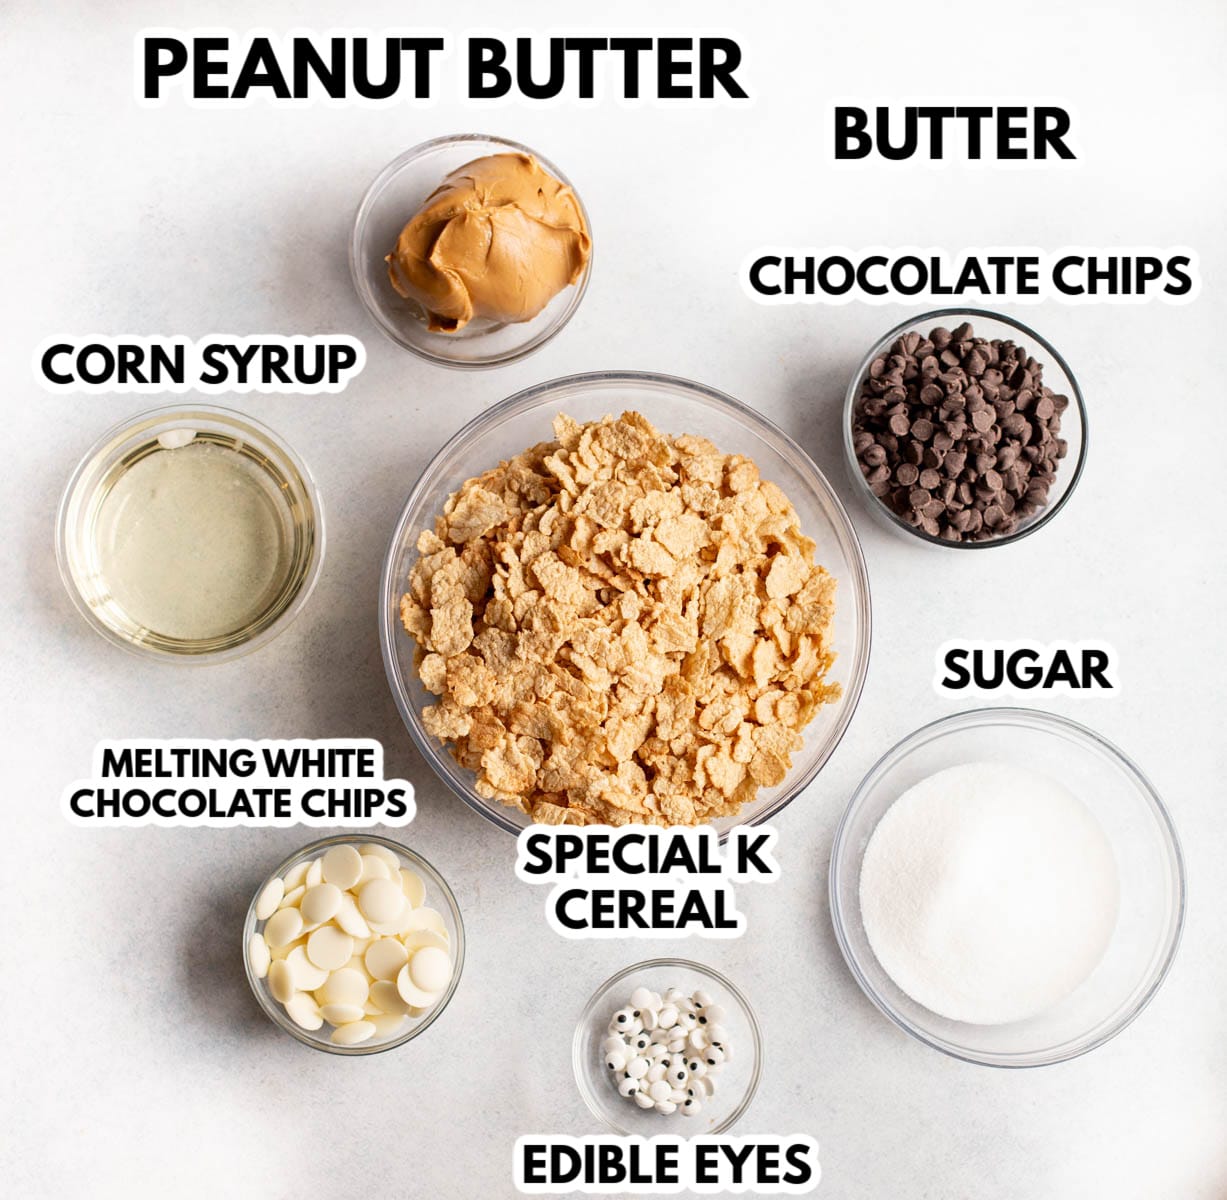
Special K Cereal - while some scotcharoos might use Rice Krispies or Corn Flakes, I like using Special K cereal
Light Corn Syrup - this adds sweetness to the bars along with keeping them super chewy.
Peanut Butter - I recommend using non-natural creamy peanut butter.
Granulated Sugar - this adds more sweetness to the bars.
Chocolate Chips - I use semi-sweet chocolate chips. I recommend using a name-brand chocolate chip package, as the non-name brands tend to seize up when I've used them.
Butter (not in picture) - this is melted with the chocolate chips to make it gooey and spreadable.
White Chocolate Melting Wafers - these are melted and drizzled over the bars to make them look like mummy bandages. You can use almond bark, too.
Candy Eyes - these are so cute and make the bars look like mummies.
Refer to the recipe card for the complete list of ingredients.
Variations
Different Decorations - if you can't find edible eyes, you could drizzle them with white chocolate to look like spider webs, or use Halloween colored sprinkles. I have also seen cute monster face decorations that would be cute on these!
Butterscotch Chips - some people love butterscotch melted with the chocolate. While I kept things simple and just used chocolate, you could do half butterscotch and half chocolate chips for the frosting.
Different Cereal - you can definitely use Rice Krispie rice cereal, Crispix, or corn flakes instead of Special K cereal.
Step by Step Instructions
Photo 1. In a medium saucepan, add the corn syrup, sugar, and peanut butter over medium heat.
Photo 2. Cook, stirring frequently, until smooth. Do not bring to a boil.
Photo 3. Drizzle the peanut butter mixture over the Special K cereal and stir until well combined.
Photo 4. Press the mixture into a well-greased 9x13" baking pan.
Photo 5. In a microwave-safe bowl, melt the chocolate chips and butter in 30 second intervals, stirring with a spoon between each interval.
Photo 6. Spread the melted chocolate mixture over the bars in an even layer. Let cool for ~30 minutes. I like to pop them in the refrigerator to get the chocolate to set up.
Photo 7. Melt the white chocolate melting chips according to package directions.
Photo 8. Drizzle the melted white chocolate over the sliced bars and then immediately press on the eyes, before it sets up. Serve and enjoy!
Expert Tips
Don’t Overheat - when melting the peanut butter, corn syrup, and sugar, remove it from heat as soon as it begins to bubble. Boiling too long makes the bars hard instead of chewy.
Work quickly - once you add the peanut butter and cereal, stir and press the mixture into the pan while it’s still warm - scotcheroos set fast!
Use Parchment Paper or Nonstick Spray - be sure to either line your pan for easy removal and clean slicing or spray it generously with a little nonstick spray.
Melt Chocolate Slowly: For smooth chocolate topping and white chocolate “bandages,” melt your coating in 15–20 second microwave bursts, stirring between each one. White chocolate burns easily!
Eye Attachment - Press the candy eyes in right after drizzling, so they stick perfectly.
Chill - Pop the bars in the fridge for 10–15 minutes to help the chocolate set cleanly.
Slice before decorating: For neat edges, cut the scotcharoos into bars with a sharp knife before adding the white chocolate mummy wraps - no cracking later!
Storage - store the bars in an airtight container at room temperature.
Recipe FAQs
Scotcheroos are chewy no-bake bars made with crispy rice cereal, peanut butter, corn syrup, and sugar, topped with a layer of melted chocolate.
Definitely! Wrap them tightly and freeze for up to 2 months. Thaw at room temperature before serving.
Yes, as long as you use gluten-free crispy rice cereal and check that your chocolate chips are gluten-free.
Yes! They keep well for up to 4 days at room temp or a week in the fridge — perfect for prepping before a Halloween party.
Other Festive Treats to Consider


If you make this recipe, please let me know! Leave a ⭐️⭐️⭐️⭐️⭐️ rating on this recipe below and leave a comment, or take a photo and tag me on Instagram with #greensnchocolate.
Halloween Scotcheroos
Ingredients
- 1 cup creamy peanut butter
- 1 cup light corn syrup
- 1 cup granulated sugar
- 6 cups Special K cereal
- 2 cups semisweet chocolate chips
- ½ cup butter
- 1 cup white chocolate melting chips or almond bark
- edible eyes
Instructions
- Add the peanut butter, corn syrup, and sugar to a medium saucepan.
- Melt the mixture over medium heat, stirring frequently. Cook until smooth and well combined, but do not bring to a boil.
- Immediately remove from heat and pour over the cereal in a large bowl.
- Mix until well combined.
- Spread the mixture into a well greased 9x13" baking dish. You can also line it with parchment paper, if you like.
- Add the chocolate chips and butter to a microwave safe bowl. Microwave in 30 second intervals, mixing well between each interval, until melted.
- Spread over the scotcharoos.
- Cool for at least 30 minutes. I like to pop them in the refrigerator to get the chocolate to set up.
- Melt the white chocolate melting wafers according to package directions.
- Cut the bars into single servings and then drizzle each bar with melted chocolate.
- Immediately press the edible eyes into the bars, before the white chocolate sets up.
- Enjoy!
