


Chocolate Peppermint Whoopie Pies
Soft cake-like cookies sandwich together a light and fluffy peppermint filling in these Chocolate Peppermint Whoopie Pies! Perfect for your holiday baking!

There’s something undeniably magical about the combination of chocolate and peppermint, especially when the holiday season rolls around. These Peppermint Whoopie Pies capture that magic in every soft, pillowy bite—rich, cocoa-filled cookies embraced by a cool, creamy peppermint filling that tastes like winter joy.
Whether you’re baking for a cookie exchange, gifting homemade treats, or simply craving something festive, this recipe brings together nostalgic flavors and cozy holiday cheer in the most delicious way. One of my favorite flavor combinations around the holidays is peppermint and chocolate and these Peppermint Whoopie Pies are at the top of my list!
Jump to:
Why You'll Love This Recipe
- Soft and Fluffy - these cookies are tender, cake-like, and melt in your mouth.
- Festive Flavor - the combination of chocolate and peppermint is perfect for the holidays.
- Versatile - you can dress them up with crushed candy canes, chocolate drizzle, or even dip them in chocolate.
- Creamy Filling - the peppermint filling is sweet, smooth, and irresistibly pepperminty.
Ingredients
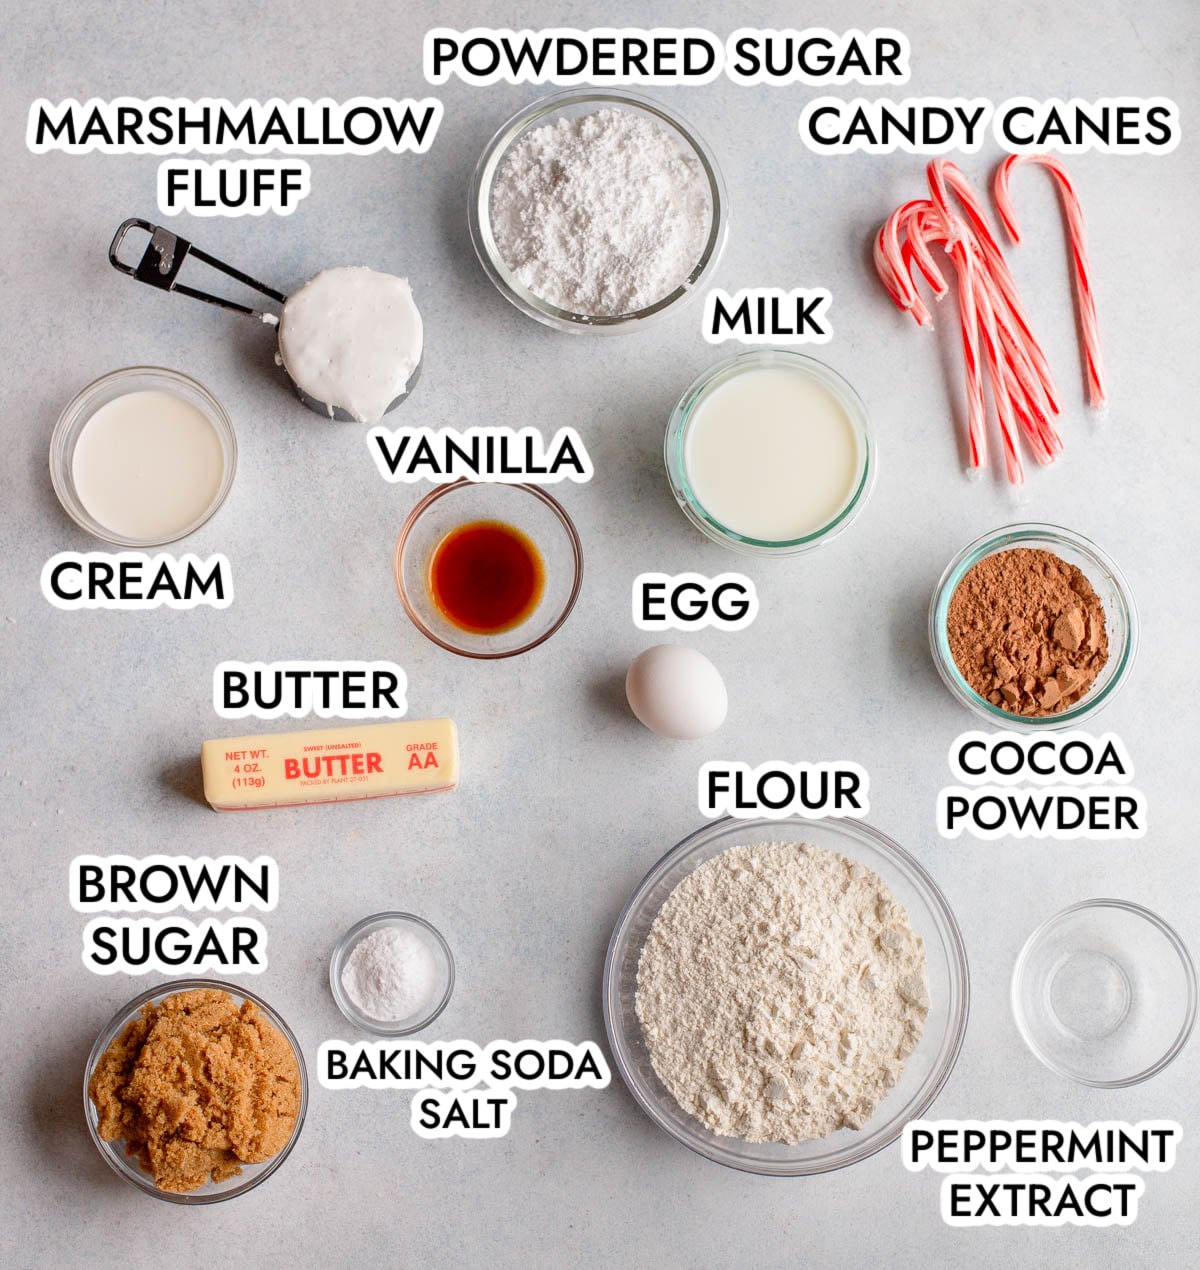
Butter - Adds richness, moisture, and a tender texture to baked goods.
Brown Sugar - Provides sweetness with a hint of molasses flavor and helps retain moisture.
Egg - Binds ingredients together and adds structure and richness.
Vanilla Extract - Enhances and deepens the overall flavor of the whoopie pies.
Milk - Adds moisture and helps create a soft, tender texture. I just used 1% milk.
Baking Soda - Acts as a leavening agent, helping the cookies rise and become light.
Salt - Enhances flavor and balances the sweetness.
Peppermint Extract - Gives a cool, minty flavor that defines the dessert’s holiday character.
Cream - or milk, to thin out the filling.
Unsweetened Cocoa Powder - Provides deep chocolate flavor and color without added sugar.
Unbleached All-Purpose Flour - Forms the structure of the cookies and helps them hold their shape.
Powdered Sugar - Creates a smooth, sweet filling and adds a creamy texture.
Marshmallow Creme - this is in the filling for a super fluffy peppermint filling.
Candy Canes - crushed and added to the filling for a little texture and peppermint flavor.
Variations
Different Filling Flavor - you could keep these classic and use vanilla extract instead of peppermint. You can also use different extracts like mint extract, almond extract, or caramel extract.
Different Add-Ins - add different add-ins to the filling like chopped toffee, sprinkles, or nuts.
Step by Step Instructions
Photo 1. In a large bowl with an electric mixer or a stand mixer bowl, beat together the butter and sugar on medium speed until well combined. Then add the egg and vanilla extract and beat to combine .
Photo 2. Add the baking soda, salt, and cocoa powder and mix until well combined.
Photo 3. Add half of the flour and half of the milk and mix to combine.
Photo 4. Add the remaining flour and milk, mixing until just combined. Do not overmix.
Photo 5. Drop 1 ½ tablespoon sized cookies onto a parchment lined baking sheet and bake at 375 degrees for 10-12 minutes.
Photo 6. In a separate bowl, beat together the butter, powdered sugar, and peppermint extract. Add milk until desired consistency is reached. Fold in chopped candy canes.
Photo 7. Divide the filling between half of the cookies, about 2 tablespoons on each cookie. You can do this with the filling in a pastry bag or just spread it on with a knife.
Photo 8. Top with remaining cookies. Add additional crushed candy canes to the sides of the whoopie pies. Enjoy!
Expert Tips
Storage - since the cookies are soft, they don’t do well stacked on each other. So I wouldn’t recommend stacking them in Tupperware containers. Instead, store them in a single layer in an airtight container in the refrigerator for up to 3 days.
Room-Temperature Ingredients - this recipe comes together best if the butter, egg, and milk are at room temperature for a smoother batter and even baking.
Don’t Overmix - Mix just until ingredients are combined to keep the cookies soft and tender.
Crushed Candy Cane Tip - For the best texture, crush candy canes finely; large shards can make biting difficult.
Cool Completely Before Filling - Prevent frosting from melting by letting cookies cool completely on a wire rack.

Recipe FAQs
Whoopie pies are a classic American treat made of two soft, cake-like cookies sandwiched around a creamy filling.
Yes! The cookies and frosting can be made a day in advance, and the assembled whoopie pies can be stored in an airtight container for up to 3 days.
Place them in a zip-top bag and gently crush with a rolling pin until finely chopped, leaving small pieces for texture.
Other Christmas Treats to Consider...


If you make this recipe, please let me know! Leave a ⭐️⭐️⭐️⭐️⭐️ rating on this recipe below and leave a comment, or take a photo and tag me on Instagram with #greensnchocolate.

Chocolate Peppermint Whoopie Pies
Ingredients
For the cookies:
- 1 ¾ cups all-purpose flour
- ½ cup unsweetened cocoa powder
- 1 ½ teaspoons baking soda
- ½ teaspoon salt
- ½ cup unsalted butter
- 1 cup packed brown sugar
- 1 egg
- 1 teaspoon vanilla extract
- 1 cup milk
For the filling:
- 1 cup unsalted butter at room temperature
- 2 cups powdered sugar
- 1 cup marshmallow fluff
- 2 tablespoons milk
- 1 teaspoon peppermint extract
- Red food coloring
- Crushed candy canes
Instructions
For the cookies:
- Preheat oven to 375 degrees F.
- Line baking sheets with parchment paper.
- In a medium bowl, add flour, cocoa, baking soda, and salt and mix until combined.
- In separate large bowl, beat butter and sugar with a mixer on medium until light and fluffy, about 2 minutes.
- Add egg and vanilla and beat for two more minutes.
- Add half of the flour mixture and half of the milk and beat on low until incorporated.
- Repeat with remaining flour and milk and beat until combined.
- Drop batter on prepared baking sheets in tablespoon clumps, each about two inches apart. Bake for 10-12 minutes each or until pies spring back when pressed gently.
- Cool for about five minutes before transferring them to a rack to cool completely.
For the filling:
- In a large bowl with electric mixer, beat together butter and powdered sugar until light and fluffy, about 2 minutes.
- Add marshmallow fluff, milk, and peppermint extract and beat another 2 minutes.
- Remove about half of the filling that will remain white.
- Add a few drops of red food coloring to the remaining filling and beat until combined. Add more until desired color is attained.
- Spread or pipe filling onto half of the cookies. Top with remaining cookies.
- Place crushed candy canes in a shallow bowl or on a plate and roll the cookie filling in crushed candy canes.
- Serve and enjoy!

Love the chocolate peppermint combination this time of year! These whoopie pies look like the perfect addition to the Christmas dessert table!